17 Feb 2016

Xiaomi yi tapping battery to quad mod

Today was a great day. after my bearing attachment mod (which probably didnt do any major changes in flight time, but might be good on the motor) i proceed with the direct to quad camera battery tap mod. My camera is a xiaomi yi which eats 3.7v thru the battery and eats 5v thru the microusb port. I didnt go thru the battery option but thru the usb port as i havent figured out how to tap it without soldering it to the battery port. And since the quad outputs a spare 3.7v, i needed a voltage converter. I was planning on getting one on Banggood but it will probably took me another 2 -3 weeks before i can proceed this project.

the cheap powerbank
So i opt for a cheap option. Modding a cheap powerbank. I got it from cdrking, cheap at probably 3 bucks (150 pesos), good thing it runs with an 18650 3.7v volts battery and ofcours the small voltage converter on it.

So i hook em up to the port. Got the terminals all line up to positive and solder them. I also skinned down and trimmed the micro usb to usb cable from 12g to a measly 3g.

The final test is running xiaomi yi with everything powered on. And seems to be all good. I loose 20g from xiaomi battery by tapping on the quads battery.

final connections, with voltage regulator
But when all seems too promising, i did a double test running the quad with the mod on it. The end point, i loose flight time but gain a little agility. Which for me was not what i've initially planned. Most probably the camera draining too much to the quad's battery, my guess was roughly around almost 1amp current.

So i might just keep this project in, probably if i got a smaller and lighter camera with small power drain in the future. will be reverting back to the stock configuration. already planning on getting a lighter camera, just a plan.

14 Feb 2016

Bright Colored Props, replaced bearings

its those damn red colors
Yesterday replaced all the bushings with bearings that means removing 30 damn screws on the quad. changed the front propeller colors to red. looks beautiful. tried a test flight last night but didnt get the to test the flight time (coz it was darn windy and wet condition. The flight was smooth. hopefully tonight will be good non windy weather so i can test this baby with the cam and flight times. hope to break the last record of 7.30 mins with cam on board (before lv kicks in)

Next project im looking into is again turning my 1200mah battery into 4s parallel (the battery that is form mjx101) since both batteries fits nicely on the battery bay, though i dont have very high hopes of getting a much better flight times compared to my dual 850mah battery.
Upcoming must have projects will be the transmitter range hack (ill do a proper range test before the hack). FPV additions (when budget comes in hopefully). lightening up my xiaomi yi (that means tapping 5v directly to the quad to loose 20gms of weight) and that means ill have to find a 5v supply for this since the inbuilt camera trigger on the quad is just 3.7v supply, hopefully i dont have to add a BEC

6 Feb 2016

My journey to the world of quadcopters Part II - S3 quadcopter battery mod

After 2 motor burn outs :(, its about time to start doing something with the flight time. With just around 3 mins with the camera on board, i decided i need to do something how to extend the flight time. I was planning on buying a bigger mah battery but the delivery times i couldnt take. So instead i decided to just combine my 2 small batteries to get more flight time.

And to do this, requires some soldering skills. That is connecting the 2 batteris in parallel.
samle parallel connection

from 2s to 4s battery with two 850mah
You have to take note of the limited wire lenghts unless you have a spare jst connector.  To the left is how it looks like. with a total of 1700mah.


Now the problem is the battery tray, which can only house 1 battery. So again i moded the tray and cut the front part and rear for the 2 batteries to slide in. And as you can see in the picture, the 2 batteries fits in nicely. Any battery with max width of 30mm should be able to fit in. Probably a single 1600mah batt can also fit inside the tray.
moded battery tray
 
I made a test flight without the camera at 11mins before low voltage kicks in. and thats roughly almost twice my flight time with just one battery.

2nd test i did was with a camera + mount, and i get 6 mins of flight time before low voltage kicks in.

Below is some flight footages with battery mod. though i didnt fly it till low voltage coz i forgot to notice my quad was flying way up high and far at roughly 200m plus which is beyond the box suggested flying range.


 Next mod will be further reduction of my mount, probably removing my xiaomi yi battery and wiring it directly to the quad, and chaning my bushings to bearings (which i am still waiting to arrive).
Hopefully i will get additional flight time. else i will look into a different camera like runcam 2 which is lighter than xiaomi by alos 30g


16 Jan 2016

My journey to the world of quadcopters - S03 quad Part 1

Usually if i have something new, i just right away use it without reading any instructional manual. I've owned numerous gadgets and toys, treated the same way once i got them on my hand.
But this new toy that I've got recently got me more excited, co'z its my first venture into quad copters. I've flown (and crashed) rc copters, but this one is different. In the first place, i have so little info about the model that it is more of a risk in buying it.

Lets cut the intro and talk about this new toy that I've got. The quad that I'm going to delve into(deeply) is called S3 Quad copter (non camera version).
S3 quad
S3 quadcopter

As you can see, if you search for this quad the only results you will get is from lazada, and much worst is the info are mixed with errors.

Below are the specifications for this quad:

2.4ghz
with 6 axis gyro
7.4v battery @ 850mah 2s
360 maneuverability
new generation explorer
led lights
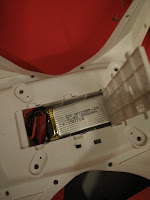
Battery
battery area
Below are my added info base on my own findings:
size of the quad with props is roughly around 400mm x 400mm
weight - (will add soon)
props - 8in props (203mm)
body seems to be built in abs shell
bright led lights in red and blue for orientation
battery size - 60mm x 26mm x 17mm
with jst connectors
charger is a balance usb type 7.4v charging cable that has an 0.8mah
it comes with spare pair of props (CW and CCW) with a small screw driver.